 As promised I have made another toddler dress from a men's button down shirt. This time I actually took pictures of the process, and more importantly I paid attention to what I was doing so that I could describe it.
 Unfortunately there are still some definite flaws in the end results and I will point those out as I go through this tutorial and hopefully I'll be able to explain how to avoid a similar fate. Lucky for me Jill is cute enough to make my poor sewing look decent. This is why I think sewing for a toddler is so wonderful.
For this project you will need a men's button down shirt (preferably one that is no longer being used by it's original owner); some bias tape or fold over elastic or some other sort of binding trim in a color that goes with the color or colors of your shirt; matching thread on a spool and on a bobbin (in my case I used a slightly different colored bobbin thread because I had a pre-wound bobbin and for some reason I find bobbin winding to be incredibly annoying when all I want to do is start my project; scissors to trim threads, cut out your pieces and all that jazz (an optional rotary cutter, guide ruler, and cutting matt will make the project easier but are not nessesary); a seam ripper might be necessary to remove the breast pocket (though the shirt I ultimately used was pocketless); snaps to attach the arm straps to the back of the skirt; and finally a toddler to test out all of the sizing on as you go.


Now you need to cut the shirt straight across under the armpits. I like to use a rotary cutter, ruler, and cutting mat for this step because it makes for a straighter and cleaner cut. Take to time to straighten everything out before you cut. I find it easier and faster to cut through two layers of fabric (the front of the shirt and the back of the shirt) at once, but if your bottom layer is laying in some sort of funky incorrect way you could potentially ruin your project before you start.
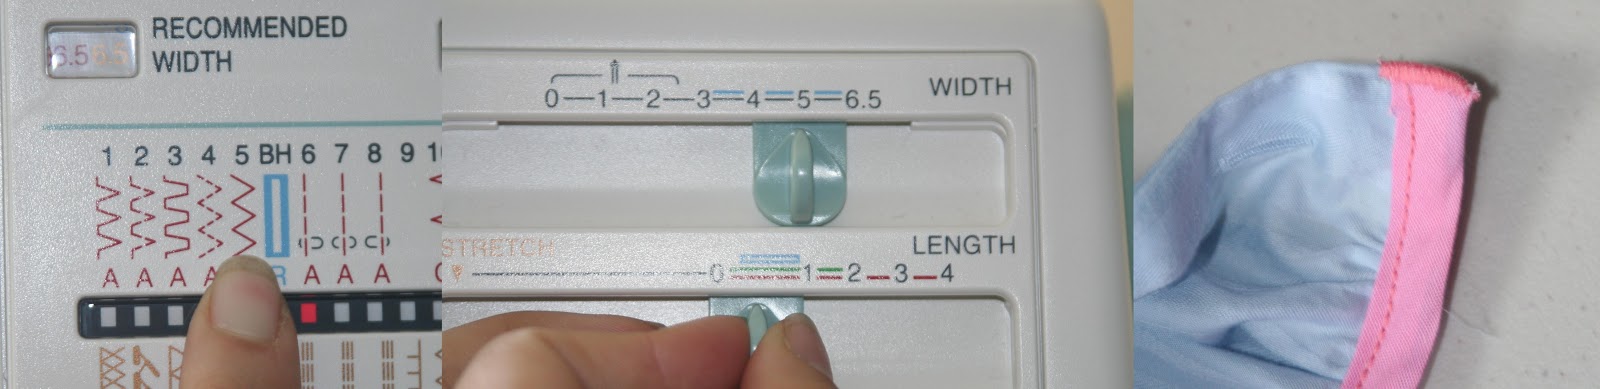
Next you should run a basting stitch all the way around the top edge that you just cut. Unbutton the shirt so that you can lay it flat- this makes it much easier to work with for the next several steps. Begin your stitch just after the button. I don't like to have the material where the buttons are be gathered so I just don't start the basting stitch there. A basting stitch is a very long straight stitch. Every machine is different, but you should select a straight stitch and then set it to as long as it will go on your machine.

 Because the stitch is so long you are going to be moving the fabric through your machine a little faster than you're used to. Just keep guiding the stitch along the edge of your fabric until you get around to the button holes. The thread that you use for this basting stitch doesn't need to be anything fancy because in the end it will not be seen. I keep a huge stand alone roll of white thread behind my sewing machine and I just thread it through for any sewing steps such as this one that don't really matter. Make sure that you leave a lot of thread on both sides of your stitch. Just pull your bobbin thread before you start sewing, and then trim your thread at the end with a lot of slack.
Now you should trim the fabric down close to your basting stitch. It will help you later to fit the gathered raw edge into your bias tape, and it will also make it easier to make the gathers and distribute them across the length of your fabric. Don't trim it too close lest you lose your basting stitch off the edge to fraying, but cut it down to about half a centimeter or 1/8 of an inch. In my pic you can see that I trimmed it down even closer than 1/8 of an inch but I was lucky and didn't lose my stitch to fraying.
Now you need to find those long bobbin threads. The bobbin thread will be the thread on the bottom side of your fabric from where you were stitching. hold onto your fabric and give the bobbin threads a good pull, working first from one side, than from the other. Push your gathers along to distribute them evenly across the entire length of fabric. Measure your toddler and cut a strip from your bias tape to that length. Continue to gather your shirt-skirt until it is roughly the same length as the bias tape.

Now it is time to create and cut a yoke (or dress top). I love tissue paper because it is cheap and allows me to cut and redesign whatever pattern pieces I want. You could use any yoke pattern piece from a commercial sewing pattern, but in this case I decided to go for it and just drew something that I thought would work. I then tested the tissue paper piece against my little one and made a few adjustments. To create my pattern piece I simply folded the tissue paper in half and drew half of my yoke/bodice shape. I cut out the piece and once it was tested against my little model I cut that shape out of the remain fabric from the button down shirt. I chose to use a piece of fabric from the back panel.


Once you have cut out your yoke/bodice you should put it on your gathered skirt with right sides together- that means the pretty side of the fabric that you ultimately want to be seen is going to be to the inside right now. This is an important step in the process that should not be rushed. I rushed it. My final product has buttons off center because of my foolish rushing. Make sure that your gathers are evenly spaced. Use the original side seams of the shirt as markers and check that one side isn't longer than the other. Take a second to pin the yoke to the skirt. You can remove the pins later, but for now this will help you make sure that as you sew things are staying put.
 Now you are going to start putting the bias tape on. Thread your machine with whatever color you are using. I always take a second to stitch a practice stitch line in a scrap of fabric before starting on my project and I'm glad that I did. My bobbin had too much thread on it and wouldn't turn so I had to adjust that before starting on the real thing.
You want to get the gathered edge of the skirt as far into the fold of the bias tape as you can. Don't worry about getting the whole skirt into the bias tape at first. Just get the first inch or so ready to go and start sewing that. You want your stitch line to be towards the edge of the bias tape that is holding your skirt to make sure that the material is held firmly in there without dropping a section by accident. Work a few inches in front of your needle- pushing the gathered material into the bias fold and then pinching the bias tape around it. Slow and steady wins the race here. Stitch an inch or two and then stop with your presser foot down and prepare the next section. At the end you can tighten or loosen your gathers as needed to fit the length of your bias strip.
Use a silk stitch to bind off the raw edges of your bias tape. The silk stitch is a very short length zigzag stitch.
 You are getting close to the end now. Flip the yoke up so that the bias binding is hidden behind it. Now you are ready to rim the yoke with bias tape. To create a finished edge open up your bias tape, fold over a small strip, and then close your bias tape back up. Use an iron to press your work flat. Now wrap the bias around the side of your yoke and once again work a couple of inches ahead of the needle. When you get to the top corner stop following the fabric and just keep stitching your bias strip closed. This is going to become of of your shoulder straps. You can see in the picture to the left how tie bias tape should follow one side of your yoke then continue on as a strap.
Repeat the process on the other side. Now your yoke has two straps and the sides have been bound. All you need to do is bind the neckline with bias tape.


Make a point out of the end of your bias tape by opening it and folding the two corners in towards the center fold. Close the bias tape and iron the new folds. Now you can line up the end of your bias tape to wrap around the bias binding you already put on the side and then sew across the neckline from there. You can silk or straight stitch that corner along your original stitching once you have gone across. You'll see what I mean in the picture to the left. Now that everything has been bias taped you are ready to finish off the dress.
If you are like me you will now have to wait for your little one to wake up so that you can try the dress on her and check where your snaps have to go. Then you'll have to wait for her to fall asleep again for another nap or for the night before you can finish the dress. Below is a picture of what your dress should look like at this point- hopefully yours is a little more symmetrical than mine is.

You can use any type of snap that you want- I like the babyville boutique snaps. You can buy them in many places online or often you can find them at Jo-ann Fabric stores. I dislike sewing snaps on by hand so the use of pliers appeals to me, and I also enjoy the colors that these snaps come in. The end of this tutorial shows how to use thus type of snap, but if you are using anything else I am sure a quick search on google, youtube, or pinterest will help you find a guide.


Take note of where you place your first snap and try to match it for symmetry on the other side of the dress. Use your awl again (more carefully this time) to poke your hole. Then take the round flat base piece of the snap and guide its spike through your hole. Now find one of those little innie pieces and stick it on top of that spike so that the fabric is sandwiched between.


And don't panic- if you make a mistake (like I did) and you actually grab too many layers of your dress into the snap you can use the handy little screwdriver they include in the snap kit (although I doubt this is its intended purpose) and pry the snap back apart. You may have to silk stitch the unintended hole closed but at least the whole dress isn't ruined.
Figure out where to place your shoulder strap snaps based on the size of your toddler and follow a similar process only use the outie part of the snap instead of the innie. And make sure that you have your snap facing the right way so that you don't have to twist the strap to get it to snap. Thank goodness that is one mistake I didn't make in this process.

Now put your finished dress on your toddler and let the adorable ensue.

A pile of cheerios were needed to encourage her to be still so that I could get a picture of the back of her dress.
I love this, Grandad has lost a lot of weight so my grandaughters will be gaining a lot of gorgeous dresses, thank you for sharing x
ReplyDelete